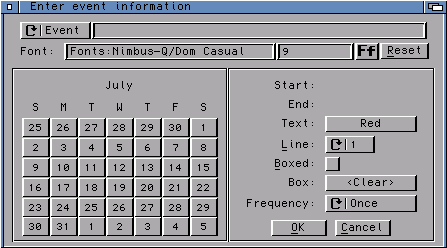
 The FWCAddEvent consists of the following fields, settings, and gadgets:
FWCAddEvent is used to add events to a calendar that has already been generated. These events do not repeat themselves every year (at least not at the same time). This differs from the Highlight Editor called from FWCalendar itself. Events entered in the Highlight Editor represent holidays, anniversaries, birthdays, and other notable dates and are added to the calendar as it is being generated.
The requestor is generated "on the fly," so a delay between placing a call to FWCAddEvent and the requestor showing up is normal.
Note that both FWCalendar and FWCAddEvent use the same preference file for initializing variables; caution should be exercised when changing the file between using FWCalendar and FWCAddEvent or the results may be unpredictable.
(ClassAct GUI only) Help bubbles can be accessed by placing the mouse pointer over a gadget and pressing the 'Help' key on the keyboard. The bubble will go away after a short time (as defined by the HelpTime variable) or upon pressing the 'Help' key a second time (in the help-bubble window).
The FWCAddEvent consists of the following fields, settings, and gadgets:
Event/File: The top-left gadget cycles between "Event" and "File" choices. When the "Event" choice is selected, you can enter the desired event in the text box. When the "File" choice is selected, a requester will pop up allowing you to select a pre-defined event data file (see Prefs & Data for the format of this file); the name of the chosen file will be displayed in the text box. In the case where a file is chosen, most of the remaining gadgets will be ghosted as the values are either read from the data file or set to the defaults.
Event: Enter the event or the name of the event file here. Any quotes (single or double) entered as part of the event will be included in the event when it is added to the calendar. See the section on Prefs & Data for information on formatting event data files.
Font: Shows the currently-selected font. The font button ("Ff") must be used to change the font.
Font Size: The small box to the right of the font name shows the font size currently in use (always a whole number when the host application is Final Writer); this can be changed as desired. Note that, although any font size can be entered, the positioning of the added line will be determined according to the AddEventRows variable and internal calculations. Looking at the image above, for example, the default font size is 9 pts. If an event with a font size of 18 pts is entered on line 3, that event will cover both lines 3 and 4; attempts to add other events on line 4 would result in the text of the events overlapping. Except for special effects, it is best to keep the font size as calculated by FWCAddEvent.
Ff: The font requester must be used to change the font. When the host application is Final Writer, a standard file requestor will appear from which you can locate and select the desired font; when the host appliction is PageStream, a list of all installed fonts will appear.
Reset: The "Reset" button will reset the font to Font.Highlight (as determined by either the internal defaults or the loaded preference file) and the font size to the value calculated by FWCalendar.
Date Selectors: The majority of the requestor consists of buttons representing the days of the month (including days of the previous and next months as appropriate). The dates clicked will alternate between being entered as the Start and End dates, shown to the right of the calendar buttons. The first date clicked will be entered as the Start date, the next as the End date, the next as the Start date, the next as the End date, and so on.
Start: Displays the selected start date for an event. The Start date does not need to be designated when the "File" option is selected; in this case, the Start dates in the data file will be taken as actual days and not offset days (see data files for more information on the format of files used with the "File" option). If the Start date is after the End date, the dates will be switched in the macro.
End: Displays the selected end date for an event. The End date does not need to be designated for single-day events, and can't be designated if the "File" choice is selected. If the Start date is after the End date, the dates will be switched in the macro.
Text: Used to select a color for the event text. When this button is pressed, a list of available colors will be presented (if the host application is Final Writer, the actual color will be shown as well). The default for the text color is determined by Color.AddEvent.
Line: Determines on which line of the date cell the event will be inserted, ranging from 0 to the maximum number of lines that will fit in a calendar cell (defaults to line 1). Note that these are the lines that will fit on a full-sized day; half-size days (those days at the end of the month that are split) will not be able to hold the full complement of lines. Certain lines may also be filled by Highlights added during generation of the calendar; events added to these lines would overwrite the highlight text.
Boxed: This checkbox tells whether events should be outlined in a box or not. All multi-day events WILL BE boxed. Boxed entries will have text lines centered; unboxed multi-line events will have the second and subsequent lines indented. An empty (text-less) box can be generated if desired.
Box: Used to select a color for the outline/background box. When this button is pressed, a list of available colors will be presented (if the host application is Final Writer, the actual color will be shown as well). The default for the box color is determined by Background.AddEvent, or <Clear> if that variable has not been set. <Clear> will result in any background picture showing through the box.
Frequency: Events can be added Once, Weekly, or Biweekly. Weekly and Biweekly events will be repeated from the starting point to the end of the month. All events can be single-day (Staff Mtg every Wednesday) or multi-day (Thursday/Friday seminar every week this month), and can wrap around the weekend.
OK: Once the desired information has been entered, click the OK gadget. The text will be drawn on the screen one or more times as it is sized to fit in the span of days you selected. After it is sized properly, it will be placed in the proper location (can you help me speed this part up?).
Cancel: The requestor will keep reappearing automatically until the requestor is cancelled or closed.
FWCAddEvent is designed to work on calendars generated by FWCalendar. To determine the calendar layout, FWCAddEvent macro reads specific information used to create the calendar from the calendar itself and from the preference file used to generate the calendar; caution should be exercised when changing the file between using FWCalendar and FWCAddEvent or the results may be unpredictable.
Texts added via FWCAddEvent are simply text objects. If one of these text objects is no longer desired (perhaps it ended up in the wrong place), it must be deleted through the host application (Final Writer or PageStream). There is no provision from FWCAddEvent to delete previously added event text.